The Dashboard: shipment tracking
Try it now
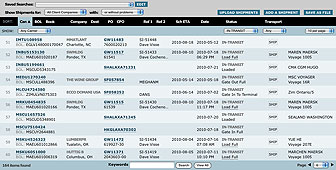
The workhorse of the system, this concise work screen provides you with a sortable
list of all your shipments:

Each row of the table contains several columns, such as: BOL#, Carrier, Ship Date,
Origin, Current Location, Destination, Status, and others.
Above the rows are column headings. When a column heading (such as
“Container”) is clicked, the list is sorted by that field. Clicking the
same column heading again toggles the sort between ascending and descending order (as
indicated by the up/down arrows).
Above the column headings are filter controls used to limit the found items
in the list. For instance, you may want to view only shipments assigned to a particular client,
from a specific carrier, only active shipments, or just those which have already been
delivered.
You can choose how many items to display on a single page of the list. The
list’s footer contains the number of records currently found, and controls to
navigate to other pages of results.
Instantly pinpoint any of your shipments with VelaTrack’s powerful search tools.
Quickly find BOLs, container numbers, client names, notes—
pretty much anything.
Use the “Keywords” box (at the bottom)
to find specific pieces of information— say, a purchase order number, a
description of a container’s contents, or a container number.
|
Comprehensive shipment details
From the Dashboard list, click on a container number to view details
about that shipment, its container, and the entire shipment history—
including ship, rail, and truck moves from all carriers associated with
the shipment. You can email the shipment history to a client.
Or download the history to your desktop as a CSV file, ready to import
into an Excel spreadsheet.
Have it your way
Each shipment contains 5 reference fields where you can store
client names, PO numbers, house BOLs— whatever you need.
From the shipment details page you can edit their contents.
From a preferences screen you can customize field labels,
date and time formats, and more.
Take note
From the details page, attach an unlimited number of notes to a shipment.
Notes are stamped with time, date, your name and initials.
In a collaborative work environment, the notes will help keep
everyone on the same page.
Notifications and alerts

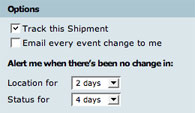
On a global or per-shipment basis, you can set alarms to alert you to
potential slow or non-moving containers.
Choose to have alerts sent to your cellphone or email account. Each time you
login to the system, you’ll be presented with a list of alert
notifications and details.
|
Share and share alike
Everyone within your company has access to all your shipments.
From the dashboard, you and your colleagues can choose to view just
“My Shipments” (the default) or
“My Company’s Shipments”.
You can also grant access to VelaTrack clients from other companies—
perfect for customs brokers, NVOs, importer/exporters, and freight
companies who need to provide their clients with active tracking.
Data in
Tell VelaTrack about a shipment by providing a valid BOL and container
number and up to 5 bits of optional reference data (ie: client name, house BOL).
Use one of these methods to enter shipments into the system:
Manual
entry. Click an “Add Shipment” button then type or paste
the data. CSV
import. Click an “Import CSV file” button, then choose a
properly formatted comma-separated text file from your desktop. Automated
import. Have your in-house system FTP CSV files to VelaTrack. As soon
as they arrive, they’re imported into our system.
Data out
VelaTrack can email shipment history, and can create CSV data files.
Additionally, you can choose to have VelaTrack automatically upload
CSV files of tracking data to your FTP site. Your IT department can
setup your proprietary systems to automatically import the data.
|